Preparing Laser Cutting Files in Rhino: Difference between revisions
Amy.Hickman (talk | contribs) m (numbering for print section) |
Amy.Hickman (talk | contribs) (Updated print section) |
||
| Line 74: | Line 74: | ||
# Under ''Destination'', select ''Rhino PDF.'' Under ''Size'', scroll down to select ''Custom''. <div class="res-img">[[File:Rhino_PDF_2.jpg|center]]</div> | # Under ''Destination'', select ''Rhino PDF.'' Under ''Size'', scroll down to select ''Custom''. <div class="res-img">[[File:Rhino_PDF_2.jpg|center]]</div> | ||
# Set ''Width'' and ''Height'' to match your selected material size, making sure units are set to millimetres. | # Set ''Width'' and ''Height'' to match your selected material size, making sure units are set to millimetres. | ||
# | # Select the following: Output Type: ''Vector Output'', Output Color: ''Display Color.'' | ||
# Under View and Output Scale, select | # Under ''View'' and ''Output Scale'', select ''Window'' and click ''Set''. This will return you to the view of your work. <div class="res-img">[[File:Rhino_PDF_3.jpg|center|600x600px]]</div> | ||
# | # Select the area to print by selecting the corners of the rectangle that matches your material sheet size.<div class="res-img">[[File:Rhino_PDF_4.jpg|center|900x900px]]</div>{{Note | ||
| inline = 1 | | inline = 1 | ||
| type = warn | | type = warn | ||
| text = If you are using multiple sheets, only select one and repeat the PDF export for each sheet. | | text = If you are using multiple sheets, only select one and repeat the PDF export for each sheet. | ||
}} | }} | ||
# Press | # Press ''Enter'' to go back to the Print window. | ||
# | # In the Print window, set ''Scale'' to ''1:1''. Set ''Margins'' to ''0.00''. | ||
# | # Click ''Print'' to finish and save file as PDF. <div class="res-img">[[File:Rhino_PDF_5.jpg|center]]</div> | ||
[[Category:Laser cutting]] | [[Category:Laser cutting]] | ||
Revision as of 13:44, 18 September 2026
Choose your laser cutter
Choose the right laser cutter for your material type and size. See more detailed information at Laser Cutting.
Trotec SP500
Maximum material size: 1245 x 710mm
Materials: Strawboard (1 and 2mm), plywood (3 and 6mm)
Location: DBE Makerspace, building 418
Trotec Speedy 400 Flexx
Maximum material size: 1000 x 610mm
Materials: Strawboard, plywood, acrylic, polypropylene, fabrics, and other materials
Location: Digital Modelling Workshop, building 202
Download the template
Download the Rhino Laser cutting templates (3dm).
Job setup
Import your work
Import your work into the template.
Check that your work is at the appropriate scale. For example, if you need to make a model at 1:100 scale, scale down your work by 0.01. If you're having trouble with scale, try a scale converter.
Choose material size
Choose an appropriate material size for your work. Use the layers panel to hide unused layers for other material sizes.
Nest objects
Move elements to fit within the boundaries of your chosen material size. If you need to use multiple sheets, make a copy of the material boundary to prepare separate sheets. Hide any layers for sheet sizes that you aren't using.
Arrange the parts of your design inside this boundary, close together, and favouring the left side. This saves money and reduces material waste.
Make sure to keep at least 5mm from the edge of your material, and at least 1mm between shapes. This allows latent heat to disperse from your material, preventing charring and the risk of fires.

Assign layers
Layers are pre-set in the template. Assign parts of your design into the appropriate layers:
- Select the element or elements to assign; for example, select all the curves you plan to cut, or the hatches you want to raster engrave.
- In the layers panel, right-click the appropriate layer (e.g. Cut or Raster engrave).
- Click change object layer.

Line weights
Line weights have been pre-set in the template. If you're not using the template, or you've added extra layers, set the following in the layers panel:
- Set Print width to hairline
- Set Line type to continuous
Remove duplicated lines
Check for any duplicated lines. To remove duplicate lines in Rhino:
- Select your work and the material boundary.
- Use the Make2D command, and input the settings shown in the 2-D Drawing Options panel below.
- Make2D will make its own layer group. You should Hide or Delete the original layer group to avoid duplicates.

Explode and join hatches and text
For all text and line-based pattern hatches:
- Use the Explode command
- Use the Join command
Do not explode solid hatches.
Export to PDF
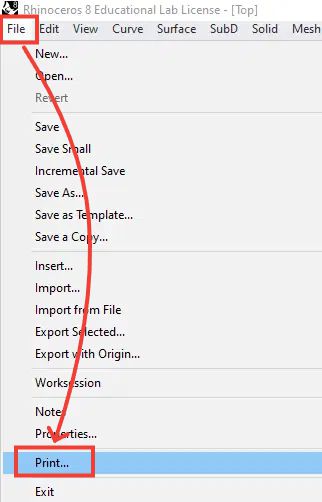
- Click File, then Print, or type in Print into the command line.
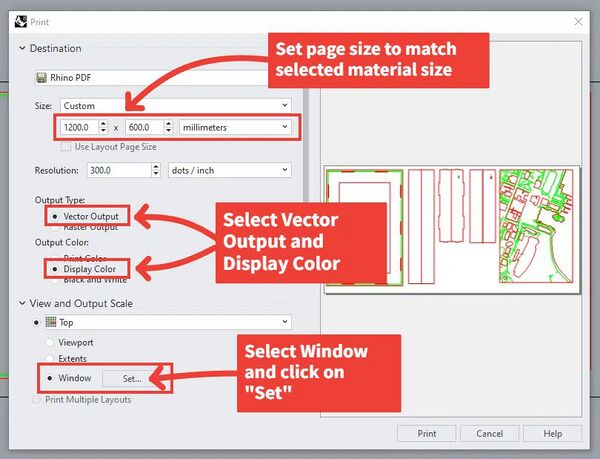
- Under Destination, select Rhino PDF. Under Size, scroll down to select Custom.

- Set Width and Height to match your selected material size, making sure units are set to millimetres.
- Select the following: Output Type: Vector Output, Output Color: Display Color.
- Under View and Output Scale, select Window and click Set. This will return you to the view of your work.
- Select the area to print by selecting the corners of the rectangle that matches your material sheet size.
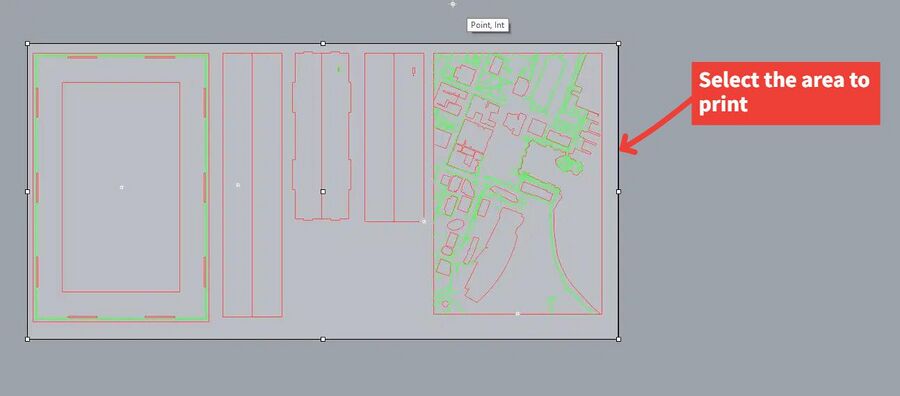 If you are using multiple sheets, only select one and repeat the PDF export for each sheet.
 - Press Enter to go back to the Print window.
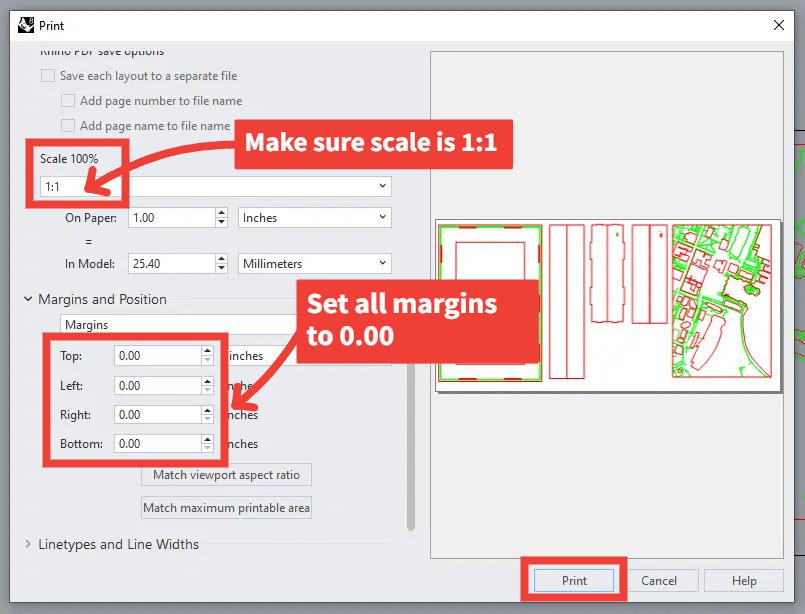
- In the Print window, set Scale to 1:1. Set Margins to 0.00.
- Click Print to finish and save file as PDF.