
3D Printing Guide: Difference between revisions
Amy.Hickman (talk | contribs) m (added link) |
Amy.Hickman (talk | contribs) m (Categorised, removed 'under construction') |
||
| (One intermediate revision by the same user not shown) | |||
| Line 1: | Line 1: | ||
This document contains instructions for preparing and producing a 3D print using [https://ultimaker.com/software/ultimaker-cura/ UltiMaker Cura] and an UltiMaker 3D printer in the [[About Makerspace|DBE Makerspace]] or [[About Digital Modelling|Digital Modelling Workshop]]. | This document contains instructions for preparing and producing a 3D print using [https://ultimaker.com/software/ultimaker-cura/ UltiMaker Cura] and an UltiMaker 3D printer in the [[About Makerspace|DBE Makerspace]] or [[About Digital Modelling|Digital Modelling Workshop]]. | ||
| Line 22: | Line 20: | ||
# Check for small features (e.g. under 1mm), like thin columns or railings, and minimize these as far as possible. You may need to thicken some parts of your model to ensure a good print. | # Check for small features (e.g. under 1mm), like thin columns or railings, and minimize these as far as possible. You may need to thicken some parts of your model to ensure a good print. | ||
# Look for disconnected parts; either join your model into one polysurface, mesh, or body, or export disconnected parts as separate STLs. | # Look for disconnected parts; either join your model into one polysurface, mesh, or body, or export disconnected parts as separate STLs. | ||
# Check for non-manifold geometry (check your model is watertight); see common issues below. | # Check for non-manifold geometry (check your model is watertight); see [[3D Printing Guide#Common issues|common issues]] below. | ||
# Convert your model to a mesh | # Convert your model to a mesh | ||
# Export your model as an STL (stereolithography) file | # Export your model as an STL (stereolithography) file | ||
| Line 116: | Line 114: | ||
In Blender, you can use the [https://extensions.blender.org/add-ons/print3d-toolbox/ 3D Print Toolbox] add-on to check your geometry. Before you start designing, it’s also wise to make sure you set up Blender for 3D print modelling – [https://www.talleye.com/posts/beginner-blender-setup-for-3d-print-modeling this online guide] covers the essentials. | In Blender, you can use the [https://extensions.blender.org/add-ons/print3d-toolbox/ 3D Print Toolbox] add-on to check your geometry. Before you start designing, it’s also wise to make sure you set up Blender for 3D print modelling – [https://www.talleye.com/posts/beginner-blender-setup-for-3d-print-modeling this online guide] covers the essentials. | ||
[[Category:Makerspace]] | |||
[[Category:Digital Fabrication]] | |||
[[Category:Digital Modelling]] | |||
Latest revision as of 13:39, 11 December 2025
This document contains instructions for preparing and producing a 3D print using UltiMaker Cura and an UltiMaker 3D printer in the DBE Makerspace or Digital Modelling Workshop.
Before you start
Install UltiMaker Cura
Download UltiMaker Cura from the UltiMaker website and install it on your laptop.
Choose a printer
Choose a printer based on your print requirements. See 3D Printing (Specifications) for reference.
For most prints in PLA under 223 x 220 x 205mm, you should use an UltiMaker 2+ Connect. Once you've completed the relevant training, you don't need supervision from a technician to use the UltiMaker 2+ Connect.
For dual extrusion prints, prints with PVA support, prints in other approved materials, or prints with other special requirements, use an UltiMaker S3 with support from a technician.
For larger prints up to 330 x 240 x 300mm, use an UltiMaker S5 (DBE Makerspace), 3 Extended or S7 (Digital Modelling Workshop) with support from a technician.
Check and export your model
- Check for difficult overhangs and empty space, and minimize these as far as possible.
- Check for small features (e.g. under 1mm), like thin columns or railings, and minimize these as far as possible. You may need to thicken some parts of your model to ensure a good print.
- Look for disconnected parts; either join your model into one polysurface, mesh, or body, or export disconnected parts as separate STLs.
- Check for non-manifold geometry (check your model is watertight); see common issues below.
- Convert your model to a mesh
- Export your model as an STL (stereolithography) file
Slicing
- Import your work into Cura by using the folder icon, or dragging your STL from File Explorer or Finder onto the build plate. See UltiMaker’s guide for more detailed information on opening models, including opening multiple models.
- Use the transform controls to scale, position and rotate your model if needed. It’s usually best to have the flattest part of your model touching the build plate.
- Configure your printer setup. Check your printer type matches the printer you will be using, and set your material configuration. Your nozzle size should always be the default (0.4mm/AA 0.4mm) unless you are getting help from a technician to use a different one.

Configuration for an UltiMaker 2+ Connect with generic PLA 
Configuration for an UltiMaker S3 with UltiMaker brand Transparent PLA and Green PLA - Select your print settings. Always review the recommended print settings, even if you don’t think you need to change any.
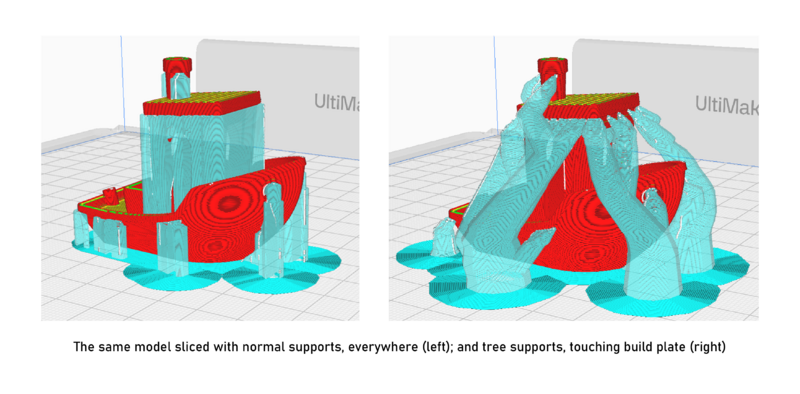
- Add support as needed. Areas likely to need supports will be highlighted in red. Consider whether you should use normal or tree support structures, and whether you need support everywhere, or only touching the build plate. A good rule of thumb is to use normal supports for large and geometric overhangs, and use tree supports for small or organic overhanging shapes, or shapes where you have an overhang suspended over another part of your model. You can test and preview different structures to better predict what will be most suitable for your work.
- Preview your work. Check if your model looks complete and solid and that all overhangs are appropriately supported. Take note of the amount of material used in grams.
- Check the first layer in the preview using the slider on the right-hand side of the screen. Check that parts of your model are being printed on the first layer (so it’s not floating), and that it has enough of a footprint to stick to the plate well.
- The next steps will vary depending on your type of printer. If you’re using an UltiMaker 2+ Connect, insert a USB and click the blue Save to removable drive button, then print following the steps below. If you’re using a different printer, insert a USB then click File > Save Project… > To Disk, and bring your USB to a technician for help printing.
- To keep a working (editable) copy of the Cura project, save a copy using File > Save Project… > To Disk to save it to your computer.


Printing (UltiMaker 2+ Connect)
This section is intended as a refresher. For the complete procedure, including details on hazards and risk controls, see the Safe Work Procedure.
- Check that your glass build plate is clean and dry.
- Level the build plate using a calibration card. Tap the Maintenance icon > Level build plate. Adjust the bed so that both the bed and the nozzle are touching the card, but not so tightly that it pinches.
- Apply one thin, even layer of glue to your build plate.
- Check that you have enough material on your spool. Use scales if needed.
- Tap the Materials icon > Change material (if there’s already a different one loaded) or Load material (if it’s empty). Follow the prompts to change your material and ensure that the printer’s settings match the material loaded (and that you set it correctly in Cura).
- Insert your USB in the machine and start your print.
- Observe your print for the first couple of layers or first 30 minutes to ensure good adhesion. Check long prints intermittently to ensure they are progressing well.
- Enter your print details in the 3D printing materials use form.
Removing and finishing prints
- Wait for the machine to cool down fully and check the display to confirm.
- Remove your build plate from the machine.
- Remove your print(s) from the build plate using a razor scraper and cut resistant gloves as needed.
- Scrub your build plate with warm water and leave it in the rack to dry.
- Always wear safety glasses to clean up your print. Use pliers to pull supports and adhesion off as needed. Use cut resistant gloves to clean up prints with sharp tools. Sandpaper can be used, but can leave marks on PLA.
- If you need to glue prints, use a craft (alcohol/acetone) glue like Boyle Craft Glue or UHU All Purpose Adhesive.
- Leave the machine and your work area in a safe, clean and tidy state.
Troubleshooting
Printer issues
First layer looks transparent OR filament not extruding
- Stop your print and wait for the printer to cool down
- Clean your build plate and return it to the machine
- Re-level your build plate. Your build plate is probably too close to the nozzle.
Print not sticking to the plate OR print lines look squiggly and disconnected
- Stop your print and wait for the printer to cool down
- Clean your build plate and return it to the machine
- Re-level your build plate. Your build plate is probably too far away from the nozzle.
Any other unexpected printer behaviour
Ask a technician for support. If you’re uncertain, you can always stop or pause your print.
Model geometry
Common issues
| Issue type | What is it? | What does it cause? | How do you fix it? |
|---|---|---|---|
| Non-manifold geometry | When an object has edges and/or surfaces that are not connected. The object does not have volume. | Some or all of the model has no volume. This usually makes it difficult or impossible to print. | Geometry must be fully enclosed (watertight), and only 2 faces may share an edge. See Tools to check your geometry below. |
| Non-unified faces | Every face of an object has an ‘inside’ and ‘outside’ direction (‘normal’). This issue arises when a mesh’s normals are not all facing in the correct direction. | Printing software will not be able to understand what is inside or outside the model, leading to unexpected results. | Check that the normals of all faces are facing the correct direction. |
| Unsupported areas | When there are not enough support structures to print your object. Some parts of your object will be printed in mid-air. | Your object may fail to print or break apart. It may cause damage to the printer. | Consider whether your model can be redesigned to support or reduce overhangs. Try rotating your model, or breaking it into separate parts (e.g. separating a roof from a building). Add supports in Cura and remove after printing. |

Tools to check your geometry
Cura will highlight some, but not all common issues. It shows areas needing support in red. It will show some non-manifold geometry errors in fluorescent patterned colours, and show an error message when importing the model.
In Rhino, the Properties pane shows what kind of object your selection is. Check the type shown in the Properties pane. It should be a closed solid polysurface or closed mesh. If it's open instead of closed, try using the ShowEdges command to find the non-manifold edges. You can use a combination of commands like Cap and Patch (for polysurfaces), or FillMeshHoles, MeshRepair and/or Shrinkwrap (for meshes) to fill holes and make your model watertight.
Make sure you don’t export your construction geometry (i.e. the curves and surfaces you used to make your model, but aren’t part of it); one way to make sure is to isolate your model before exporting.
In Blender, you can use the 3D Print Toolbox add-on to check your geometry. Before you start designing, it’s also wise to make sure you set up Blender for 3D print modelling – this online guide covers the essentials.